Introduction
One of security challenges is to verify that a user requesting access to a protected resource is who they claim to be and that they are permitted to access the requested resource. MFA is a process that uses two or more factors to verify an identity. These factors are:- Knowledge (username/password, PIN, etc), Possession (hardware token, mobile device, etc)and Inherent (fingerprint, voice, face recognition, etc). PingOne MFA IDP Adapter allows PingFederate to use the PingOne MFA service for multi-factor authentication (MFA).
Objectives
- Configure PingOne admin console for PingOne MFA application and policies
- Configure PingFederate to use PingOne MFA services for authentication
Good to Know
- PingOne MFA IdP Adapter 1.6.1
- TOTP MFA to be used for a mobile authenticator application
- PingFederate is being used as an IdP role
Pre-Requisite
- PingOne and PingFederate admin access and PingOne MFA license apart from PingOne and PingFederate license
- One non-default Environment and PingOne MFA service is added in that environment
- One SP application is integrated in PingFederate to be tested with MFA
- One Selector created in PingFederate and that SP application to be tested is added in it.
- One IDP adapter (either HTML form or HTTP basic) already created to be used as first factor in MFA testing
Steps to follow at PingOne Admin console
- PingOne Integration with PingFederate
- In the PingOne console, go to Connections > PingFederate > Add Connection.
- Enter Connection Name and a Description then Save and Continue.
- At next page Copy the Credentials and Go to PingFederate administrative console and add the connection in it. For further steps to complete the integration, go to page 8.
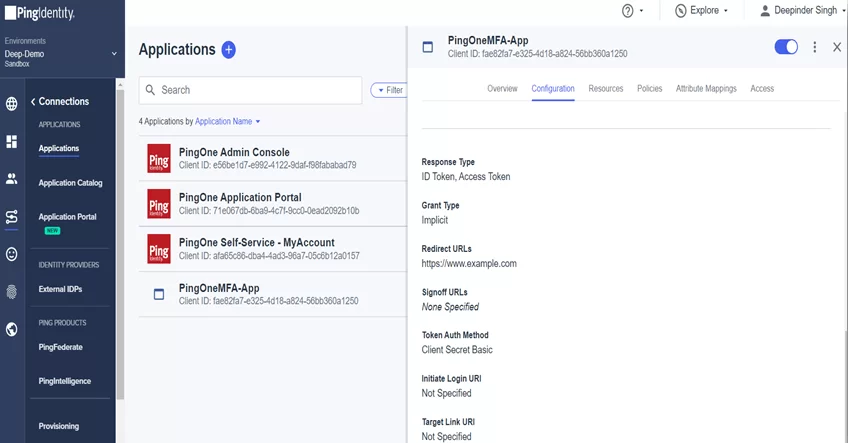
- Create a OIDC web application.
- In the PingOne console, go to Connections > Applications > + icon.
- Provide application Name and Description and in Choose Connection Type, select OIDC Web App, click Save.
- Go to Configuration tab and click on pencil icon to edit, click to expand the General section.
- In the Response Type section, select Token and ID Token.
- In the Grant Type section, select only Implicit. Click Save. Close the Application Details pane.
- In the Redirect URLs field, enter any URL, such as https://www.ping.com. Click Save.
- Click the Resources tab, then click the Pencil icon. Click and drag scopes in the left column to add them to the Added Scopes column on the right. Click Save. click the toggle to Enable the app.
- Configure an authentication policy
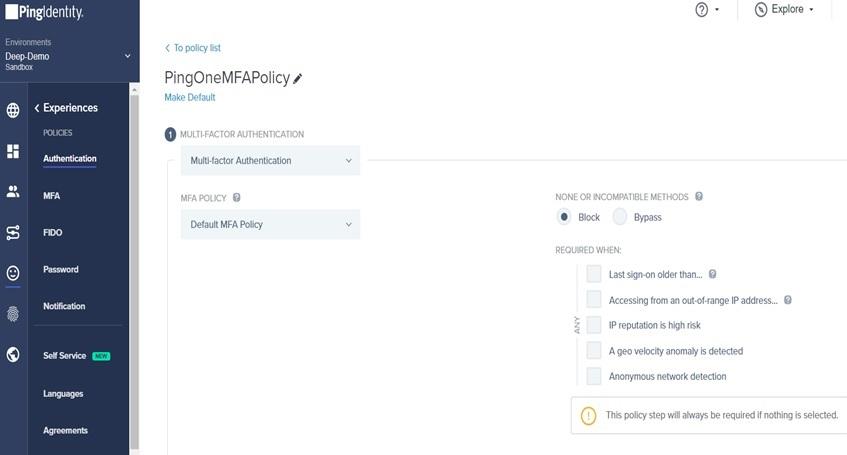
- In the PingOne console, go to Experiences > Authentication Policies > Click + Add Policy.
- Enter an appropriate Policy Name and In Step Type, select Multi-factor Authentication. In the MFA policy select Default MFA Policy and click save.
- Note: Make sure authentication app (TOTP) is enabled, in the Allowed authentication methods under default MFA policy.
- Associate your authentication policy with your OIDC web app.
- In the PingOne console, go to Connections > Applications.
- Go to web application created in step 2. Click the Policies tab and click pencil to edit.
- Click on add policies and select authentication policy created in previous step. Click Save.
- Create a user and enable MFA.
- In the PingOne admin console, go to Identities > Users. Click + Add User.
- Enter user details and Click Save and Close. Click the toggle to Enable it.
- Enrol an authentication device to user account.
- In a browser window, go to PingOne Self Service URL, example: https://apps.pingone.com/<envId>/myaccount/
- At the sign on prompt, enter the username and password created in step 5.
- At the top of the page, click Authentication. Toggle on multifactor authentication.
- Then Click Add Method and select Authenticator app.
- On your mobile, download any authenticator app (example google authenticator), open it click on + icon and select scan a QR code and select the QR code showing on the browser in above step.
- To complete pairing enter the TOTP that is showing on the mobile app. Click Next.
Example:

Steps to follow at PingFederate Admin console
- Complete PingFederate Integration with PingOne
- In the PingFederate admin console, go to SYSTEM > External Systems > Add Connection.
- Provide the credentials which was copied in the step 1 page 3.
- Enter Connection Name and a Description then Save.
- Create PingOne MFA IDP Adapter
- In the PingFederate admin console, go to AUTHENTICATION > IDP Adapters > Click Create new instance.
- Provide instance name and instance ID and select type as PingOne MFA IdP Adapter 1.6.1 and click next.
- Select PingOne environment, PingOne population (select default population) and Application from the drop-down list which was created in previous steps on page 3. Click next.
- In the action tab, validate the test connection and get populations. Click next and Next.
- Under adapter attributes, select username as unique user key attribute and Pseudonym. Click Next and Next and Save.
- Create authentication policy for MFA
- In the PingFederate console, go to AUTHENTICATION > Policies > Add Policy.
- Provide policy name and in the POLICY select the selector (example: which has an SP application to be tested for MFA).
- In the NO section of policy, select Done and in YES section, select your any IDP adaptor to be used as first factor in the authentication.
- In the FAIL result, select Done and in the Success result, select your MFA IDP adaptor which is created in previous step.
- In FAIL and Success result of MFA, select Done in both, then Click Done and then Save.
Example:


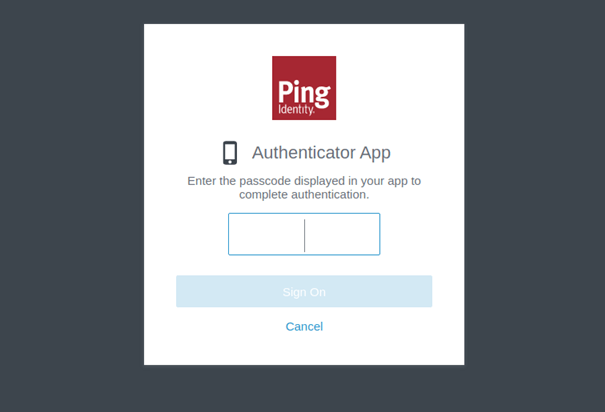
Test the configuration
Login to the SP application URL, complete the first factor (username and password), click Sign On, after that user will get popped up with second factor. Example below: